Saturday, 26 July 2014

Beetrooted Adventures

Beetroot is one of my favourite roasted veg and we have been eating quite a few baby beets simply roasted in the meat juicy pan and a sprinkle of salt, but here we will share other lovely ways to serve beets.

Beetroot bulbs fresh from the garden
Beetroots have long been used for medicinal purposes, primarily for disorders of the liver as they help to stimulate the liver's detoxification processes. The plant pigment that gives beetroot its rich, purple-crimson colour is betacyanin; a powerful agent, thought to suppress the development of some types of cancer.

Raw beets are an excellent source of folates and vitamin C and is also rich source of B-complex vitamins such as niacin (B-3), pantothenic acid (B-5), pyridoxine (B-6) and minerals such as iron, manganese, copper, potassium and magnesium.


Beetroot in the garden
Beetroot is rich in fibre, exerting favourable effects on bowel function, which may assist in preventing constipation and help to lower cholesterol levels too.

Beetroot fibre has been shown to increase the level of antioxidant enzymes in the body, (specifically one called glutathione peroxidase), as well as increase the number of white blood cells, which are responsible for detecting and eliminating abnormal cells. Beetroot is also one of the richest sources of glutamine, an amino acid, essential to the health and maintenance of the intestinal tract.

Beetroot is rich source of phytochemical compound, glycine betaine. Betaine has the property of lowering homocysteine levels within the blood. High levels of homocysteine in the blood result in the development of coronary heart disease (CHD), stroke and peripheral vascular diseases.

Other studies have looked at the effect of beetroot juice on blood pressure. A reduction in blood pressure is beneficial for the avoidance of heart disease and stroke. Studies state that nitrate rich foods like beetroot may help in heart attack survival.

Beetroot leaves in a salad harvest
Beetroot contains betaine, which in other forms is used to help treat depression, and trytophan, the feel good chemical in chocolate.

Beetroot Greens should not be overlooked in the harvest menu. The greens are an excellent source of carotenoids, flavonoid anti-oxidants, and vitamin A; They contain these compounds several times more than that of in the roots. Vitamin A is required for maintaining healthy mucus membranes and skin and is essential for vision. Consumption of natural vegetables rich in flavonoids helps to protect from lung and oral cavity cancers. They also provide dietary Protein, Folate, Pantothenic Acid, Phosphorus and Zinc, and a very good source of dietary fibre, Vitamin C, Vitamin E (Alpha Tocopherol), Vitamin K, Thiamin, Riboflavin, Vitamin B6, Calcium, Iron, Magnesium, Potassium, Copper and Manganese.
Beetroot microgreens

Beetroot sprouts have a light earthy taste, just a touch different and neutral in combination with other vegetables. It is the fantastic colour that that makes all the difference on your plate. Mostly used to decorate salads, toast dishes and other snacks or stir fries. The sprout are rich in vitamins, amino acids and mineral salts, they are easy to digest and have a low calorie content. Eaten raw, they maintain all of their nutrient value.

Beeturia is a harmless condition of passing red or pink colour urine after eating beets and its top greens. The condition can be found in around 10-15% of the populations who are genetically unable to break down betacyanin pigment.

Beet greens contain oxalic acid, a naturally-occurring substance found in some vegetables, which may crystallise as oxalate stones in the urinary tract in some people. It is therefore; in individuals with known oxalate urinary tract stones, kidney stones, are advised to avoid eating excess greens.

Caramel Beets


Ingredients

12 fresh baby beets (don't buy canned!, the vinegar they can them in will ruin this recipe!)
100 gm butter
4 tbsp brown sugar (raw will do, rapadura/muscarvardo is better)
3 tbsp fresh cream

Method
Melt butter in a small pan, Peel baby beets, add beets to melted butter and rigorously 'fry/cook'. 
In approximately 5 minutes when the beets are slightly softened add the sugar and allow to bubble, occasionally shaking the pot to stir (remember DO NOT WALK AWAY, burning sugar does not smell nice!) 
When the sugar has dissolved and reached the hard ball stage add the cream.

The most glorious reddish caramel savoury sauce occurs and, the beets just absorb it.

The beets were so luxuriously sweet and creamy they had changed from the slightly earthy tasting vegetables that bleed red all over the plate into a delightful sweet and savoury side.

Pickled Beets 1

ready for pickling

peel and slice beetroot, place in a large saucepan and cover with a bottle of red, half bottle of apple cider vinegar and a spoonful of honey. Adjust the liquid so that it covers the beetroot completely.

Simmer gently for until the beetroot feels tender but still crunchy.  The wine/vinegar/beetroot juice goes kind of thicker and darker and its done.

Put the slices into sterilised jars while hot then pour the hot liquid over the top and make sure there is no air bubbles, screw on the lids and as it cools, the pop tops will suck in.

Store in a dark cupboard - they keep for ages.


Perfect addition to a salad

Pickled Beets 2


see Pickled beets above but using rapadura/muscarvardo sugar  instead of honey and add cloves and peppercorns. I like to get them as babies (golf ball size) and have them whole early in the season and then do the sliced ones later so I have variety.


Beetroot Dip (so pink it's crazy!)


Ingredients

1 large fresh beetroot trimmed and well scrubbed
Beetroot dip as part of a platter
1 * 1.5 litres fresh home made natural yoghurt
(yes you can use greek if you want)
salt to taste
rind of half lemon finely grated

Method
Place your yoghurt in 2-3 layers of fine muslin or cheese cloth tie up and hang until the whey stops dripping and the yoghurt is thick (this new product is called Labna or yoghurt cheese) 8 hours should be enough
Roast your beet in a hot oven until tender, peel and chop finely. Place all your ingredients into a processor and blend roughly. season to taste and serve.

* Reserve your whey for birchering oats


Beetroot White Chocolate Icecream


Ingredients

Beetroot White Chocolate Icecream
300 g fresh beetroot
4 x egg yolks
100 g raw sugar, milled to a fine powder
200 ml double cream
300 ml whole milk
100 g white chocolate broken into small pieces


Method

Roast the beetroot in a oven proof pan with 1 cm water and covered with foil for approximately an hour or until tender. Remove and leave to cool.

Put yolks in a bowl with the sugar, whisk sugar and egg yolks until well beaten.


Heat 200 ml of the milk and all the cream in a pan to scalding. Pour milk and cream mix over egg and sugar mix whisking as you go.


Return custard to the saucepan and heat over a gentle heat stirring constantly until mixture has thickened to cover the back of a spoon. Take off the heat and pour into a clean bowl to cool. Stir occasionally to prevent a skin forming.

Custard for Beetroot Icecream

Melt the chocolate over a gentle heat.


Peel beetroot and chop roughly. Place chopped beetroot in a blender along with the remaining 100 ml of milk and blend until smooth. Add the beetroot puree to the cooled custard, mix and add the chocolate and stir thoroughly to incorporate.


Place the mixture in an ice cream maker and churn for approximately 45 minutes. Place the icecream in a freezer proof container and finish in the freezer.


serve with Beetroot and Chocolate Cake.


Beetroot and Chocolate Cake


Ingredients

Beetroot and Chocolate Cake
180 g self - raising flour
75 g cocoa
1/2 tspn bicarbonate of soda
125 g beetroot, finely grated
125 g home made or greek yoghurt
1 Tbls fresh mint, finely shredded
3 x eggs, free range & organic
200 ml olive oil, extra light virgin
1 tspn vanilla extract
100 ml beetroot juice, freshly juiced
10 ml olive oil, extra light virgin
200 g dark chocolate, 70%


Method

Preheat your oven to 180degC
Sieve the cocoa powder, self-raising flour and baking powder into a bowl and stir in the sugar
In a separate bowl, whisk the eggs, grated beetroot, yogurt, oil and vanilla extract until it is well blended.
Add the beetroot mixture to the dry ingredients and mix together and then pour this in to a pre-lined spring form cake tin.
Bake for 30 minutes or until it is springy to the touch and a skewer comes out clean.

For the ganache:
Place the beetroot juice and the olive oil into a saucepan and bring to the boil.
Pour over the chocolate and mix together until smooth.
When the cake is cooked and cooled, pour over the beetroot ganache and serve with beetroot white chocolate icecream


Beetroot Ink - this makes a reddish-pink ink

1. Boil a couple of beetroots then either juice them using a juicer or mash then up and strain through muslin or a fine sieve ( if using a sieve you may have to strain more than once to get any fibres out).
2. While the juice is warm (if it’s cooled just reheat in a microwave or on a stove) add in a little gum arabic powder, stirring until this juice has thickened slightly.

Believed to have magickal properties associated with the feminine, Saturn, Earth and Love. Use as an ink in love magick, also as a blood substitute and for healing old wounds from the past.

Friday, 18 July 2014

Rocketing to Arugula

Rocket
In my mind the salad herb rocket, or arugula in the US, is a far superior inclusion to the annual produce garden than most lettuce varieties. Love it's complex peppery flavour and it's versatility, it's pretty flower and it's nutricious seeds.

Rocket is low in Saturated Fat, and very low in Cholesterol. It is also a good source of Protein, Thiamin, Riboflavin, Vitamin B6, Pantothenic Acid, Zinc and Copper, and a very good source of Dietary Fiber, Vitamin A, Vitamin C, Vitamin K, Folate, Calcium, Iron, Magnesium, Phosphorus, Potassium and Manganese. It has a good balanced Omega 3 to omega 6 ratio and a zero glycemic index.


Rocket Flower
Rocket can stimulate the body's detoxifying processes as well as stimulate healthy appetite and digestion and will often help with dyspepsia. It can be an effective source of vitamin C and help prevent scurvy as well as being a source of antioxidents.

The seed can be pressed to produce an oil called taramira or jumba oil which upon aging to reduce it's acridity can be used for cooking, dressings, preserving and massage and the pressed seed mass is used as a nutritious animal feed. This oil as been traditionally used for gum pain relief, digestive and diuretic needs. However a side effect sometimes noticed is it's aphrodisiac qualities. Taken in moderation only as the seeds can irritate the thyroid, have an emetic effect and cause some digestive distress.


Rocket, caramelised pear and walnut salad with blue cheese 

Variation with pine nuts

1 large bunch of fresh rocket
2 not quite ripe pears cut into segments
1 table spoon of butter
2 tablespoons brown sugar
1 shot of mead
1/3 cup walnuts
200gm crumbly blue cheese
1/3 cup walnuts chopped (additional)

Dressing
1 tablespoon bush honey
2 tablespoons vine cotta vinegar
4 tablespoons cold pressed virgin olive oil

caramelising the pear
Melt your butter and brown sugar in a heavy based pan, simmer gently until a caramel forms and add your pear segments and mead, coat well and gently cook your pear until tender.
Turn off the heat and add your walnuts and coat in the hot caramel and allow to cool.
wash and dry your rocket and place on a serving platter, artfully place your pear, walnuts and bluecheese all over the rocket.


Place your dressing ingredients in a glass jar and shake until well mixed and drizzel over your salad
top with raw chopped nuts and serve.

Rocket, Pear and Goat's Cheese Salad

Rocket, Pear and Goat's Cheese Salad

2 pears, sliced (choose a crisp variety)
100gm soft goats cheese
2 handfuls baby rocket leaves
1 teaspoon tomato relish
1 teaspoon extra virgin olive oil
salt and freshly ground pepper to taste

Arrange the pear, rocket and cheese for serving
place the relish, oil and seasonings in a jar and shake and pour onto the salad.
Additional fresly ground pepper to serve.


Rocket Pesto 

Rocket Pesto

Ingredients:
large bunch of garden fresh rocket
large handful of grated parmesan 
1/2 cup roasted cashews
1/3 cup of cold pressed virgin olive oil
1/4 cup lemon juice (mandarin juice is quite tasty too)
salt & pepper to taste

Method:
blend the rocket, oil, cashews & juice together mix in the parmesan and season.


Rocket Pesto Linguini
Pasta with Rocket carbonara


Enjoy with pasta, salad, hot and cold meats. 


Using petals as a garnish
rocket petal garnish for
buttered parsnip mash


I love using the whole of the plant where possible and to this end the delicate petals have found their way into our menu as a garnish. A touch of elegance and gentle harmony is never out of place.

Tuesday, 15 July 2014

Bread Baking at Home


Nothing, and I mean nothing, fills the home with homely gourmet delight than the smell of fresh baked bread. Leaving aside the potentials of soft doughy white bread confections there is a whole world of toasty, crusty, tasty possibilities that come under the heading "Bread".

Now I have to be honest as I don't eat bread myself for various reason not gluten related, but I can live vicariously through my bread eating family and the heavenly scents that are my enjoyment of the bread making process.


Basic Bread


65gm Yeast disolved in luke warm water
800gm self raising flour
1/8 cup raw sugar
large pinch salt
400ml water, room temperature

Method
Mix the dry ingredients well and make a well and add the water and yeast. bring the dough together gently without over working. Place dough in a lightly greased bowl , cover and allow to rise for at least 1/2 hour in a warm position.

Divide the dough into 2 and  shape into loaf desired. Now is when you add any flavour elements you desire. Allow to rise for another 1/2. Shape into final loaf and embelish buy slashing the crust or glase as desired. Please into lightly greased tin and bake in a 220degC oven for 45 mins. Makes 2 loaves.

Check loaf is cooked through by tapping and it should sound hollow. Cool on a rake. The smell will tempt you to burn your mouth - just add butter!

Sourdough Starter
and wholemeal spelt flour

Sourdough Starter Recipe 


Ingredients
  • 1 small handful (1/4 to 1/3 cup) white (all-purpose) flour
  • 1 or 2 tablespoons of water
Tools & equipment
  • a small bowl
  • a towel, napkin, or other piece of cloth (not terry)
  • a large spoon
Directions:
  1. In a mound of flour, make a small well and add the water.
  2. Slowly mix the flour and the water, bringing more flour into the center of the well. The mixture will gradually transform from a paste into a small piece of dough.
  3. Knead this small piece of dough with your fingers for about 5-8 minutes, until it becomes springy.
  4. Place the dough in a small bowl, cover it with a damp towel, and let it sit in a warm spot for 2 or 3 days.
  5. When it's ready, the dough will be moist, wrinkled, and crusty. If you pull off a piece of the crust, you'll find tiny bubbles and smell a sweet aroma.
  6. Throw away any hardened crust. "Refresh" the remaining piece by mixing it with twice the original amount of flour and enough water to make a firm dough. Set aside as before.
  7. After 1 or 2 days the starter will have a new, fresh look. Remove any dried dough and mix with about 1 cup of flour.
  8. Once again, cover the bowl with a damp cloth and leave it in a warm place for another 18-12 hours.
  9. When the starter is ready, it will appear fully risen, and a small indentation made with a finger won't spring back.

Now the starter is ready to be used in virtually any sourdough recipe.
Remember to save a small piece of the starter: You can put it in the refrigerator for several days, then refresh it again as above and use it to make another loaf. A good starter will serve you for years to come!

The above is a typical 'true' Sourdough recipe, I have seen several that allow you to utilize a commercial yeast, whilst this allows you to make a starter in a much shorter time frame, and stops the higher risk of introducing a non-suitable 'wild yeast' to the starter, it does not allow you to get the real smell and taste of sourdough.

We were lucky enough to receive a 15 year old starter from San Fransisco Bay area from friend at The Rustic Pantry in Moruya. Due to the amazing resilience of the starter, it can survive for a month in a refrigerator, and be restored to baking quality in less than 18 hours by simply adding a cup of the chosen flour and a cup of lukewarm water, and mixing well to remove any lumps, and storing on a room temperature bench, or shelf until it is required for production of bread.

Wholemeal Spelt Sourdough Recipe
A good Knead

Ingredients:
  • 1 cup of revived Sour dough starter
  • 5 cups of water
  • 3 tablespoons of extra virgin olive oil
  • 13 cups of Wholemeal Spelt flour
  • 4-6 teaspoons of salt

Mix the culture, water, oil and salt in a large bowl. Gradually add flour until too stiff to mix with a wooden spoon or by hand. Turn out on a lightly floured surface and knead well, adding any remaining flour from the original recipe. When no more flour will be taken up by the dough whilst kneading it is ready for the next step.

Fold the dough into a nice uniform round and place into a container that has been very lightly wiped with olive oil (remember the round will increase in size at least by double, so make the container of a corresponding size!) and cover with a damp tea-towel, and proof in a kitchen over night, or longer in a cooler area. next morning punch it down gently, and kneed for 1-2 minutes and make into 2 large or 4 smaller loaves ( or a heap of bread and rolls as I did :) ) and proof again for 3-5 hours at kitchen temperature.

wholemeal spelt soughdough
Again expect volume to double at the least. Pre-heat oven to 200 degrees Celsius, and bake each loaf for 20 minutes, then turn the oven down to 180 degrees Celsius for a further 20 minutes (this time will depend entirely on the size of your loaves, so check the bread after 10 minutes by tapping the bottom of the loaf with a finger tip, if it rings back with a solid thud it is perfectly done, if it doesn't sound like a drum it may need more time). Turn out immediately onto a wire rack to cool, or get a big pile of butter and start eating whilst it is hot :)
Wholemeal spelt sourdough rolls

I had great fun making my first ever Wholemeal Spelt Sourdough bread, because of the wholemeal texture of the Spelt Flour (that I also got from The Rustic Pantry thanks to Bronywn) It was a real shoulder work out, and I had great difficulty actually holding my mobile phone still enough to take the pictures :P. The next day I made 5 saucer sized, croissant shaped buns, 2 normal loaves, and 1 Cob loaf.

Sour Dough Crumpets


  • 200g Plain Flour
  • 90g Sour Dough Starter
  • 260g warmish Water
  • 60g sugar
  • 2g salt

With a chopstick, agitate the starter and water to disperse the starter.  Then continue to incorporate the flour into a smooth batter.  You can leave it to autolyse for a time if you wish.
Add the sugar and salt and give a good mix with the chopstick for a couple of minutes.
Cover the jug with Glad-wrap and leave on the bench to rise.  The volume increase will depend, but should be at least 50-100%.  Depending on your temperature this might be anything from a few hours to overnight.  Try not to let get to the stage where the volume is decreasing.
Set your electric fry-pan to 295F (or whatever experience tells you is good).  Give the fry-pan and your crumpet rings (100mm*20mm) a light wipe with your favorite source of fat.
Place the rings (four rings just fit nicely) in the pan and give a few minutes to heat up.  Pour batter from the jug to half fill the rings.  This takes a bit of practice due to the gloopy nature of the batter.  Don't try to ladle the batter as I have found that this destroys the gas bubbles for the later crumpets.
Cook for 10 minutes with the rings in place.  Remove the rings and cover the fry-pan and cook for a further 5 minutes.
Lift onto a wire rack to cool.


Flavour adventures:

so far we have created loaves with incredible flavours using about 1 1/2 cups of flavour elements such as .....

Olive, feta & thyme bread

Olive & pepita bread

Olive, feta and rosemary wholemeal
spelt
sourdough bread
Olive, feta, thyme and sundried tomato bread
great for brushetta!
Olive, feta and fresh roasemary bread

Using home made feta!Home made olive tapenade bread
dark and mysterious!

Oat bread

Wholemeal spelt sourdough
banana bread
Maccadamia & pumpkin seed (pepita) rolls
We had one roll that went a bit stale and I grated it and made stuffing for a roast chikken - worked wonderfully!

Cheese (mozzarella and tasty) and bacon bread

fruit loaf using dried apple, currents, craisins, shredded coconut, crystalised ginger, walnuts, chia dash of port & angostura bitters and topped with an egg wash and rolled oats

Banana bread

Olive, greek oregano & caper bread topped with egg wash and pumpkin seeds

Why not try your favourite flavours?

and make a gourmet sandwich


Peanut Butter Bread

Peanut Butter Bread

Ingredients

  • 375 g peanut butter, all natural sugar free *
  • 3 x eggs, whole large
  • 1 Tbls vinegar, apple cider or to taste
  • 1 Tbls baking soda
  • 1 pinch salt
  • 1 handful seeds of your choice

Method

Using a hand mixer blend the nut butter and eggs to a creamy consistency.
Add the vinegar and salt and mix for a further minute and well combined.
Line a greased loaf tin suitable for a small loaf and preheat the oven to 170 degC
Add the soda and beat very briefly until combined and pour the mixture into the loaf tin,level neatly, top with seeds and put into the preheated oven.
Bake for 30-40 minutes
Allow to cool in the tin then turn out and cool.
A treat warm with butter, nut butter or toasted.
Notes
* Any nut or seed butter can be substituted for peanut butter. I have had success with tahini bread and macadamia bread.
** Low carb and can be enjoyed in moderation in ketogenic diets

Toasted Banana Bread

Banana Bread


Ingredients

  • 2 cups whole meal spelt flour
  • 1 cup all purpose plain flour
  • 2 duck egg, beaten
  • 1/2 cup butter, softened
  • 1 Tbls baking soda
  • 1 teaspoon salt
  • 1 over ripe bananas, mashed

Method

Using a hand mixer blend the sugar and butter to a creamy consistency.
Add the eggs and banana and mix for a further minute until well combined.
Mix the dry ingredients and make a well to pour the wet ingredients into and bring the dough together
Preheat the oven to 170 degC, Line a greased loaf tin suitable for a small loaf and pour the mixture into the loaf tin,level neatly and bake for 50 minutes. Test that the bread is done by inserting a skewer and if it comes out clean it is done.
Allow to cool in the tin then turn out and cool.
A treat warm with butter or toasted.

Saturday, 12 July 2014

Duck Eggs on the menu

Daisy
After 7 months of patient duck management we have successfully transitioned our beautiful Daisy Demented from bedraggled chook marshal to productive lady of feather in her own right. One of the few things left to bring perfection to our coastal residential idyll was duck eggs and now we have them I can't say how delighted I am.

Daisy was a feather pulling sad young lady when we first got her and now she is a full feathered and decidedly fat waddling charmer with a penetrating and resounding quack and a satirical eye. Our first role for her was free range snail annihilator and slug chaser and now all our kindness is eggily fruitful.


Our first duck egg
Many would have that duck eggs are merely excellent in cake baking, but I would challenge this idea and put forward that they are magnificent in many a recipe where richness, luxury and egginess play their part.

Below you will find recipes where duck eggs are an integral part in pasta, mayonnaise and even celebrated as their own feature ingredient.

So let's celebrate duck eggs!

Duck Egg Pasta


450g Plain flour
4 Large Duck Eggs
1 Tspn of salt
1 Tspn olive oil
duck egg fettuccine
 
Method
Place flour and salt into a bowl, add all eggs and oil and using hands mix well trying not to over work. When it is a nice even ball wrap in glad wrap and place in refrigerator until required (minimum time about 40 minutes). Using a pasta machine make your pasta to your desired shape.


scotched duck egg

Scotched Duck Eggs


Ingredients:
10  duck eggs
600g good-quality pork sausage mince
2 tbsp Dijon mustard
2 tbsp chopped chives
2 tspn thyme leaves
2 cups (300g) plain flour
1 1/4 cups (125g) dried breadcrumbs
1/4 cup (60ml) milk


Method:

Place 8 of the eggs in a pan of cold water, bring to the boil, then simmer over medium heat for 2 minutes. Plunge eggs into a bowl of iced water and set aside.

Place sausage meat, Dijon, herbs and 2 tbsp cold water in a bowl. Season and mix well to combine. Form into 8 patties.

Carefully peel the eggs and gently pat dry. Enclose each egg in a patty, shaping with your hands to ensure the egg is completely covered. Chill for 15 minutes.

Season flour with salt and pepper, then spread on a plate. Spread breadcrumbs on a separate plate. In a bowl, beat milk with the remaining two eggs. Roll the sausage-encased eggs first in the flour, then in the milk mixture, and finally in the breadcrumbs to coat well. Chill again for 15 minutes.
 
Preheat the oven to 170°C.

 
Half-fill a deep-fryer or a large pan with oil and heat to 190°C (a cube of bread will turn golden in 30 seconds when the oil's hot enough). Fry the eggs, in batches, for 2 minutes or until golden. Place eggs on a baking tray and bake for 10 minutes until the meat is cooked through.


Serve warm or cold. Perfect for picnics.
 

Duck egg aioli

Duck Egg Aioli


Ingredients:
3 duck egg yolks
1 cup of olive oil, cold pressed extra virgin
1 head of garlic
salt and freshly ground pepper to taste
2 tablespoons of lemon (or lime) juice

Method:
Dip the garlic head in oil and place in a moderate oven for 15-20 minutes or until the garlic flesh is tender and fragrantly roasted. Squeeze the roasted garlic flesh out of the cooled head and mash.

Whisk the egg yolks until the mixture begins to become paler. Slowly drizzle in the olive oil all the while whisking until the mixture thickens and emulsifies as much of the oil as possible. Continue to whisk until quite thick, add the garlic mash and the juice.

Season to taste and serve as a richly delicious dressing or dip. Perfect served with garden fresh steamed globe artichokes as a dip

Gourmet Potato Salad

potato salad

Ingredients:

6 large potatoes, cubed
2 duck eggs
1/2 tspn salt
4 tbsp duck egg aioli (recipe above)
1 green onion, finely sliced
1 handful spinach, shredded
2 sprigs mint, finely shredded
2 sprigs fresh dill, finely shredded
6 nasturtium flowers, petals only
salt and ground pepper to taste

Method:
Boil the cubes of potato in salted water until tender and drain.
Place duck eggs in water to cover and bring to the boil and boil them  for 3 minutes then plunge into cold water to stop the cooking process. Peal and cut into wedges.
Place potato, egg wedges, greens and aioli into a large bowl and combine. sprinkle with nasturtium petals and season.
serve warm as a side or cold as a salad

duck egg scramble

Scrambled Duck Eggs


Ingredients:
4 duck eggs
4 tbsp cream
8 tbsp full cream milk
2 pinch rosemary salt
2 tbsp butter
1 handful spinach, shredded

Method:
whisk the eggs, salt, milk and cream together until well combined. Melt the butter in a pan and add the egg mixture. Stir the coagulating egg  and keep agitating until the scramble is still only just moist and turn off the heat.

Serve on a bed of spinach


Pescaphobe's Kedgeree

Pescaphobe's Kedgeree


Ingredients:
1 smoked hock, cut in half
3 chicken thigh fillets
2 bay leaves
2 cups milk
4 duck eggs
½ cup peas, freshly shelled
1 tbsp butter
1 tbsp sunflower oil
1 onion, finely chopped
1 large red sweet chilli. finely sliced
1 heaped tbsp medium curry powder
1 cup basmati rice, rinsed in cold water and drained
3 tbsp double cream
3 tbsp chopped fresh parsley
½ lemon, juiced
freshly ground black pepper

Preparation method:
Place the hock and chicken in a large pan. Pour over 500ml milk, add the bay leaves and bring the water to a gentle simmer. Cook the meats for 15 minutes until it is just done and flakes easily. Drain in a colander set over a bowl, reserving the cooking liquor, and discard the bay leaves.Pour the cooking liquor into a medium saucepan and stir in the rice. Cover with a lid and bring to the boil. Reduce the heat and simmer the rice very gently for 10 minutes. Turn off the heat and leave the rice covered for 3-5 minutes more. By this time it should have absorbed all the liquor.

While the rice is cooking, bring some water to the boil in a medium pan. Add the eggs and cook for eight minutes. Drain them in a sieve under cold running water and when cool enough to handle, peel them carefully and set aside.

Melt the butter with the oil in a large pan and cook the onion and chilli over a low heat for five minutes until well softened, stirring occasionally. Add the curry powder and cook for another 3 minutes, stirring constantly. Place the cooked rice into the pan and stir into the onions. Add the peas, cream, parsley and a few twists of ground black pepper.

Remove ham from the hock and slice into rough chunks with the chicken and add these to the pan. Gently stir the lemon juice and cook for 1-2 minutes. Cut the eggs into quarters and place them on the rice. Cover the pan with a lid and heat through for 2-3 minutes or until the eggs are warm, then serve.
 
If not serving immediately, Tip the kedgeree into a warm dish and dot with a few cubes of butter. Cover with foil and keep warm in a low oven for up to 20 minutes before serving.

Duck Egg Curry

Duck egg curry

Ingredients:
6 soft boiled duck eggs, pealed
1 large onion, chopped
1 tbsp coconut oil

3 large cloves garlic, chopped
1 inch lemon rind, finely sliced
3 baby fennel roots, chopped
1 tbsp ginger root, chopped
1 inch fresh turmeric, chopped
1 large green chilli, chopped
2 tbsp madras paste
1 cup coconut yoghurt with chia
large pinch salt
6 baby fennel, sliced
1 serve udon noodle
1 large zucchini, spiralised medium
2 large sprigs coriander, chopped


Method:  
Mash the garlic, fennel root, lemon rind, chilli, turmeric, salt and ginger until flavours released, but not quite a paste. Sauté the onion, paste and spice mix off and add the fennel and yoghurt and a splash of water and gently simmer until the veg is tender.
add the eggs and allow to warm through.
cook the udon as directed
add the zucchini to the curry sauce and warm through then serve on the udon

Tuesday, 8 July 2014

Adventures in Sausage Making

One of the projects we invested in with great success was mince and sausage making. Nothing quite compares to the satisfaction of frying or BBQing your very own sausage and the combinations and flavours are only your own imagination away.

We found a mincer and sausage maker on sale at Aldi and with our limited budget threw caution to the wind and grabbed it. Our happy sausage making adventures began so allow me to share some of our delightful recipes.

Garlic and pepper pork & veal sausage

Garlic & Pepper Sausage

2.4kg pork & veal
5 cloves garlic
5 tbsp fresh coarsely ground black pepper
5 tsp salt
5 tsp paprika 
½ cup chopped fresh sage ¼ loaf sour dough bread slowly toasted in a low oven
1 cup red wine 
Sausage casings (approx 3 meters well soaked overnight)
Use a mortar and pestle to pulverise the bread to produce a fine crumb
Pass all the garlic, meat and attached fat through the course mince setting.
Add the sage and all other ingredients and combine well by hand.
Pass the blended ingredients through the mincer again to ensure a homogonous mix.

Place the casing on the sausage stuffing cone and adapt for sausage stuffing.


Pass the sausage mix once more to stuff the prepared casing.


knit your sausage into smaller serving sized sausages.


Lamb & Rosemary Sausages


2.5kg lamb leg strips complete with fat
1 handful fresh rosemary tips
1 cup red wine
1 bulb garlic roasted whole in olive oil for 15-20mins in a hot oven
6 teaspoons salt
6 teaspoons freshly ground black pepper
3 teaspoons paprika
2 cups sour dough bread crumbs
2 metres of hog casing

pass the lamb through the mincer on a course mince setting
pass the skinned roasted garlic and the rosemary at the same time
add all other ingredients to mince and then pass it through the next finer setting.
mix well to ensure the mince is evenly flavoured
change the mincer to the sausage stuffing setting and apply the hog casing ensuring the end is knotted
feed the mince into the mincer and stuff your casing.
knitt the sausage into links or wrap in a spiral and skewer to bake whole

Links and BBQ spiral
Lamb & rosemary sausages in the making


Chicken sausages

Chicken Sausages

5 kg Chicken Marylands (ask the chef to debone them and reserve the bones for stock)
1 head of garlic oven roasted for 20 minutes
5 tablespoons course salt
3 tablespoons finely chopped sage
3 teaspoons paprika
1/2 cup sour dough bread crumbs
Hog casings

Method as above
Mascerating the blueberries and rind

Bambi and Smurf Sausages

3kg venison shoulder, cut into strips
1kg pork belly and pork suet fat, cut into strips
1 punnet blueberries
1 rind of seville orange, finely shredded
1 cup rosehip and fig port (or port of your choice)
2 tbsp herb salt

hog casings

Mascerate the berries and rind in the port
Bambi & smurf sausages

Method as above

These sausages were a great hit and the blue skins of the blueberries are testement that there are smurfs in there.

you can see the smurfiness!


 Served with home made chutney and a shaving of parmesan cheese ... perfect!

Sunday, 6 July 2014

Yoghurt in all it's glory

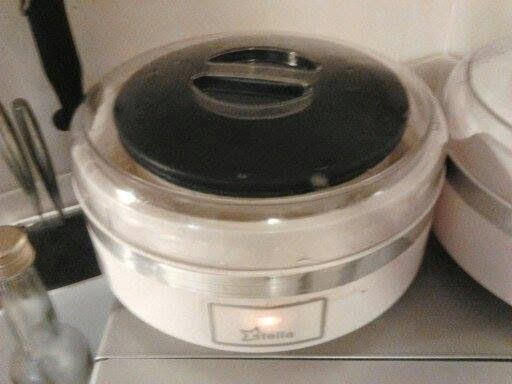
In the scheme of things easily added into a self invested lifestyle yoghurt has to be right up there. The first thing we made ourselves from scratch was yoghurt. We purchased a cheap incubator that has 7 small glass cups and plastic lids and made about a litre of yoghurt.


Our yogurt maker
Batch 1 was awesomely delicious and so we were encouraged to keep on keeping on.

Batch 2 was unusual and had an odd stretchy texture and a mild taste. It was still delicious.

Batch 3 we thought we mixed up the yoghurt culture with the cheese culture (silly bunnies) and we also overheated the milk and it boiled - testament to not making yoghurt when excessively tired. The result was quite thick and had air bubbles in it, but the flavour was still really good so yoghurt must be pretty bomb proof in this house.

At this point we became unsatisfied with the quantity we could achieve in one batch and went shopping for a single large glass dish with a lid that would fit in the incubator. Success! we found the perfect dish with a 1.6 litre capacity and so we now have the means to make 1.5 litres of our delicious yogurt all in one go!

Batch 4 awesome!

We then bought another incubator so I guess you could call us, at this point, yoghurteers with a potential problem of oversupply.

Natural Yoghurt


Ingredients
1.5 litres full cream milk
3 drops calcium chloride solution
1 dose yoghurt culture

Method
Heat the milk to 93 degC in a stainless steel pan and maintain for 10 minutes then add the calcium chloride solution. Remove from heat and rapidly bring down to 40 degC - We used a sink with cold water and ice packs. Add culture and pour into your incubator. Incubate for 8 hours and then refrigerate.

Makes 1.5 litres of natural Yoghurt.

Doesn't keep long cause we eat it too fast!

Quick Breaky

Quick Yoghurt Breakfast


1/2 cup of yoghurt
1 teaspoon Chia
2 tablespoons raw rolled oats
fresh fruit of your choice (grapes and passionfruit in picture)

mix the yoghurt with the chia and oats and top with fruit .. easy!

Bircher Oats


1 cup of raw rolled whole oats (you can use quinoa flakes or flakes of your choice)
1/3 cup chopped dried fruit of your choice
2 teaspoons chia seeds
1 cup whey from cheese making (you can use apple juice or milk)
pinch salt

combine your ingredients and soak overnight in the fridge. Top with yoghurt and fresh fruit and if desired a drizzle of honey.

Riata


Riata
1 cup yoghurt
1 cucumber grated
1/2 cup coriander leaves finely chopped
2 tablespoons mint finely chopped
good pinch of salt

Combine well and serve with your hot curry

Soured Yoghurt Cream


1 cup yoghurt
juice of 1/2 lemon

combine well and use instead of sour cream

Mango Lassi

Mango Lassi


1 mango flesh cubed
350ml natural yoghurt
1 tbs honey
1sprig of mint finely shredded
blend mango, yoghurt and honey serve with mint on top

Frozen Yoghurt


4 cups yoghurt
3 passionfruit
1/2 cup honey

gently fold the ingredients together without completely blending. Place in a freezer container and place in the freezer. Gently stir every 1/2 hour. Serve after 2 hours with fresh fruit or fruit salad.
Alternatively use an ice cream maker as directed.

Coconut Yoghurt Pudding

coconut yogurt pudding
4 cans Ayam Coconut cream (the purest on our market shelf)
warm the coconut to 40Deg C
1/3rd cup sago
2 inches vanilla bean
2 teaspoon chia seeds
whiz the sago, vanilla and chia in a spice grinder until as fine as possible
stir into the warmed coconut
3 tablespoons of natural cultured yoghurt

whisk the yoghurt into the coconut mixture and place all into a yoghurt incubator for 8 hours
serve with clotted cream and fresh berries

Labna (labaneh, labneh, labni)

All this amazing yoghurt allows us to make yoghurt cheese and as we upgraded our production to 1.5 litres batches and subsequently doubled our production with another incubator we now have plenty of yoghurt to play with. Labna is thick and creamy and much like cream cheese with a beautiful texture.

Pressed Labna
Ingredients:
1kg fresh home made natural yoghurt
20gm cheese salt
6 large cloves of garlic (optional for garlic Labna)

Method:
Combine the yoghurt and salt mixing well. Spoon the mix into a cheese cloth placed in a bowl, gather up the edges so that the yoghurt is in a tight ball, tie of and hang in a cool place over night. When the yoghurt ball has stopped dripping untie it and place into a container and chill in the fridge.

Roast the garlic cloves in a 180 degC oven for 15 mins. Squeeze the garlic flesh out of the papery casing and mash. Pass the garlic mash through a sieve and mix into your yoghurt cheese.

Eat with crackers, as a creamy spread for sandwiches, as a topping for baked potato ...... any where a savour cream cheesy flavour would go!

We pressed ours in the cheese press for a denser creamier labna wheel

Friday, 13 June 2014

Sprouts Glorious Sprouts


I have long been a fan of sprouting and of course eating the wee baby plantlets as crispy yummy morsels. With the gift from a friend of some lentils and a 2 litre glass jar I began my sprouting adventures.

I started out with just the lentils and merrily sprouted 1/3 cup of dried lentils each time and added them madly to everything. On their own as a crisp fresh snack, as a substitute for rice, as an ingredient for soups and stews and in salads. I used them raw and when a hot meal was involved I just sterved the sauce over the lentils or stirred them in after the meal was removed from the heat.

I then spied mung beans in the dry produce section of the green grocers and invested in a bag. Upon reading up on the sprouting time for mung beans I discovooured thet they shared a similar germination period as the lentils and after a single sprout crop of 1/3 cup I simply mixed them together and enjoyed their twin delights of mixed mung and lentil sprouts.

During a sojourn in an asian grocer I managed to find dried adzuki beans and being the mad sprouter I immediately spotted the potential in their little red hearts as sprouts! again I invested in a bag and studied their sprouting times and again noted the similarities to both mung and lentils. I now had a trio of sprouts to grow and enjoy.

It wasn't long before I was enjoying a kilo of sprouts a week in so many and varied ways.

My new sprouter


It soon became time to invest in a more professional sprouting unit, but I was loath to invest in a unit of the size and space consumption as I saw on the spouting sites. With a diamtre of 45cm (approx) and the capacity that would far and above exceed even my mad ability to consume sprouts I didn't think I could justify the expense. I then found a unit half the size and cost and with the addition to my family of the delightful James who can help me eat my way through the kilos of sprouting potential I was ready to invest in this more modest unit.


I was also been gifted with organic mung beans, fenugreek and sunflower seeds by a beautiful E-sister and so my sprouting potential increased by adding fenugreek and sunflower microgreens to the menu.

Why Spouts?


pea shoot
Sprouts are the ultimate fast food, but you won't be sacrificing any nutrition. Alfalfa sprouts have more chlorophyll than spinach, kale, cabbage or parsley. Alfalfa, sunflower, clover and radish sprouts are all 4% Protein. Compare that to spinach - 3%, Romaine lettuce -1.5% and Iceberg lettuce- 0.8%, and milk -3.3%. These foods all have about 90% water. But meat and eggs are the protein foods for Americans. Meat is 19% and eggs are 13% protein (and 11% fat). But Soybean sprouts have 28% protein, and lentil and pea sprouts are 26%. Soybeans sprouts have twice the protein of eggs and only 1/10 fat the fat.

Grain and nut sprouts, such as wheat and sunflower, are rich in fats. While fats in flour and wheat germ have a reputation for going rancid quickly (stores should refrigerate them), fats in sprouts last for weeks. The valuable wheat germ oil in wheat sprouts is broken down into its essential fatty acid fractions over 50% of which is the valuable Omega 6. While sunflower oil is our finest source of omega 6, germination of the sunflower sprout micellizes the fatty acids into an easily digestible, water soluble form saving our body the trouble of breaking it down and simultaneously protecting us against the perils of rancidity. This is a great bonus for a sprout that is already popular for its crispness and nutty flavor.

Radish sprouts have 29 times more Vitamin C than milk (29mg vs 1mg) and 4 times the Vitamin A (391 IU vs 126). These spicy sprouts have 10 times more calcium than a potato (51mg vs 5mg) and contain more vitamin C than pineapple. If you examine what is happening during germination, it looks like a vitamin factory. While mature radishes contain 10 IU/100g of provitamin, the radish sprouts contain 391 IU, 39 times more! No wonder, sprout lovers say you can feel the vitamins!

Alfalfa, radish, broccoli, clover and soybean contain concentrated amounts of phytochemicals (plant compounds) that can protect us against disease. Canavanine, an amino acid analog present in alfalfa, demonstrates resistence to pancreatic, colon and leukemia cancers. Plant estrogens in these sprouts function similarly to human estrogen but without the side effects. They increase bone formation and density and prevent bone breakdown (osteoporosis). They are helpful in controlling hot flashes, menopause, PMS and fibrocystic breasts tumors.

Johns Hopkins University School of Medicine researchers found substantial amounts of glucosinolates and isothiocyanates in broccoli sprouts which are very potent inducers of phase 2 enzymes that protect cells from going malignant. The sprouts contain 10-100 times higher levels of these enzymes than do the corresponding mature plants.

Alfalfa sprouts are one of our finest food sources of saponins. Saponins lower the bad cholesterol and fat but not the good HDL fats. Animal studies prove their benefit in arteriosclerosis and cardiovascular disease. Saponins also stimulate the immune system by increasing the activity of natural killer cells such as T- lymphocytes and interferon. The saponin content of alfalfa sprouts multiplies 450% over that of the unsprouted seed. Sprouts also contain an abundance of highly active antioxidants that prevent DNA destruction and protect us from the ongoing effects of aging. It wouldn't be inconceivable to find a fountain of youth here, after all, sprouts represent the miracle of birth.

Which Sprouts?


Lentil Sprouts Lentil sprouts are rich in protein, iron and vitamin C.  You can use them in salads with dulse (yum!), in sprout loaves, breads, and in green drinks.  They also go well with marinated vegetables or a super yummy lentil sprouts soup.

Fenugreek Sprouts
Fenugreek sprouts are rich in vitamins E, C, B and A, zinc, potassium, phosphorus, magnesium, iron, calcium, carotene, phytonutrients, chlorophyll, amino acids and protein.

Mung Bean Sprouts
Mung beans are rich in protein, vitamin C, folic acid or folate, iron, zinc, potassium, magnesium, copper, manganese, phosphorus & thiamine. Mung beans are also high in fibre, low in saturated fat, low in sodium, and contain no cholesterol.

Adzuki Bean Sprouts
Adzuki beans are about 25% protein and a rich source of lysine, amino acid. They contain all the amino acids except for tryptophan. Adzuki beans are also a rich source of iron, niacin and calcium.

Sunflower Sprouts
Sunflower sprouts are eaten as micro greens and snipped when small green leaflets are sprouted and these are almost 25% protein, contain vitamins A, D, E, and the B complex, provide incredible amounts of potassium, and are high in calcium, magnesium, and iron.


GREAT WAYS TO SERVE SPROUTS (and suggested varieties)

Add to tossed salads
Use in coleslaw (cabbage, clover, radish)
Try in potato salad (mung bean, lentil)
Try in wraps and roll-ups (alfalfa, sunflower, radish)
Stir-fry with other vegetables (alfalfa, clover, radish, mung bean, lentil)
Blend into fruit shakes or juices (cabbage, mung bean, lentil)
Blend with vegetable juices (cabbage, mung bean, lentil)
Replace celery in sandwich spreads (lentil, radish)
Mix with soft cheeses for a dip (mung bean, radish)
Grind up and use in sandwich spreads (lentil, radish)
Top grilled cheese sandwiches after grilling (alfalfa, clover)

Stir into soups or stews when serving (mung bean, lentil)
Mix into pancake or waffle batter (buckwheat)
Eat them fresh and uncooked in a sprout salad (salad mixes)
Top omelette or scrambled eggs (alfalfa, clover, radish)
Combine in rice dishes (fenugreek, lentil, mung bean)
Add to sushi (radish, sunflower)
Sauté with onions (mung bean, clover, radish)
Puree with peas or beans (mung bean, lentil)
Add to baked beans (lentil)
Steam and serve with butter (mung bean, lentil)
Use in sandwiches instead of lettuce (alfalfa, clover, radish)

Benefits of Sprouted Grain
Sprouted grain is fundamentally different from whole grain in three fundamental ways:
1. sprouting grain activates food enzymes;
2. sprouting grains increases vitamin content, and 3. sprouting grain neutralizes antinutrients like phytic acid which bind up minerals preventing your ability to fully absorb them.

When examining the nutrient density of sprouted wheat to unsprouted wheat on a calorie-per-calorie basis, you’ll find that sprouted wheat contains four times the amount of niacinand nearly twice the amount of vitamin B6 and folate as unsprouted wheat. Moreover, sprouted grain contains more protein and fewer starches than unsprouted grain and is lower on the glycemic index than its unsprouted counterpart.

Preparing Sprouted Grain While it may take a few days to sprout grain, it’s not as labor-intensive of a process as it might seem. All grains and seeds can be sprouted following these basic instructions. Sprouting time may vary from grain to grain. Take care to choose only organic, untreated grains as they tend to sprout more evenly. In our kitchen, we sprout several cups of seeds at a time; however, you can sprout smaller amounts depending on your needs and how you will be using the sprouted grain.

How to Sprout Grain
Start with clean grain, so take care in sorting through it to make sure all pebbles and grains with poor appearance are adequately removed.
Rinse grains thoroughly.
Add grain to a ceramic or stainless steel crock, pouring filtered water over the grain until the grain is completely submersed under several inches of water.
Soak the grains overnight.
In the morning, pour the grains into a fine mesh sieve and rinse them well.
Throughout the day, rinse the grains multiple times taking care to stir them so all grains are rinsed evenly.
Continue rinsing the grains for two to three days until the grains have sprouted to your liking.
Rinse the grains one last time, drain them and either refrigerate them or dehydrate them to grind into flour.

Care with Alfalfa
Please enjoy alfalfa sprouts in moderation. They are quite tasty, I used to eat a lot of them myself, but they contain canavanine, which is an amino acid. Our body thinks it is arginine, but can't use it. It really hinders arginine absorption. So don't eat the alfalfa sprouts every day. Clover tastes pretty much the same, and is a good substitute.

Please enjoy alfalfa responsibly.
Arginine and canavanine have similar structures. The body tries to incorporate canavanine into proteins/enzymes where arginine should go and you get a misfolded protein. Canavanine can cause lupus type systems.
Its relatively common in legumes, like alfalfa. Pigs refuse to eat foods high in canavanine. It seems human tastes do not even notice it.

Acknowledging information from Steve Meyerowitz, Sproutman®